Assalamu’alaikum. Hi guys!
In this video, we will discuss how to create a simple vector logo or icon in Krita. Then export the logo in SVG format. We are going to create a logo or an icon that looks like the Linux Red Hat logo. But of course, with some differences. We’ll make the hat shape simpler. And we will also add a fire element behind the hat.
Besides the video, I’m also providing the text version of this tutorial below. I guess this will help people who prefer written content.
Basic information
Before we start. For those of you who are just starting out learning graphics, there are 3 important things that I need to convey.
The first is about Krita. Krita is free and open-source software that you can download from “krita.org”. At the core, Krita is actually a raster-based digital painting software, not a Vector software. So, it wouldn’t be fair to compare Krita’s vector features with special vector software such as Adobe Illustrator or Inkscape, etc. But, even though it’s not as complete as vector software, for creating simple SVG vector graphics such as logos or icons, Krita is more than capable.
The second thing that I need to mention is how vectors are rendered in Krita. Like other raster software that provides vector features, for example, Photoshop, Gimp, Clip studio paint, and so on. Vectors in Krita will be rendered or displayed as if they are raster. So if we zoom in too close. The image will appear pixelated. But, don’t worry, the original vector data is independent of the image resolution. So if you export the image into a vector format such as SVG, the resulting vector image will not be pixelated if you later zoom in or scale it.
Then, the last thing I need to mention is about the SVG format. SVG stands for “Scalable Vector Graphics”. It is a vector format with open standards. Unlike other vector formats, which are generally “proprietary“. This is the reason why many people choose this file format to transfer vector data from one software to another or use it for icons and logos on websites.
Preparing the document
Let’s start by creating a new document. Make the width 1000 pixels. And make the height 1000 pixels also. For the resolution, we can set it to 300 PPI.

Please note that the quality of vector graphics is not bound by the size or the resolution of the image. Meaning that you may freely scale vector graphics without worrying about damaging them. However, this document parameters will determine the default state, when later you view the SVG file in the browser or other viewers. To make things easier later down the road, we should just use the common size of a raster image that can fit nicely on our monitor. Not too small and not too big either. For other parameters, just leave everything the defaults. Then for the content category, we will start with only a single layer, which is a white background layer. We will add more layers later gradually. Click the “create” button to create the document.
Vector layer and Grid
To create vector graphics in Krita, we need a special layer called the “vector layer“. For this, you can press the small arrow button next to the big plus button in the “layers” docker. Then choose the “add vector layer” command.

Or you can also use the shortcut Shift + Insert. For vector object alignment, you can use the “Arrange” docker. But in this tutorial, I want to show you another way of aligning objects which is using the “grid” feature. To use it, you can open the “View” menu. Then click on the “Show Grid” checkbox. You can also use the shortcut Ctrl + Shift + “. After that, to make vector objects and their elements snap to the grid points, you also need to activate the “Snap to Grid” option. You can use the shortcut, Ctrl + Shift + ; to toggle this snapping feature.
Creating the hat
We can start by creating the hat. I want to use a light blue color, slightly toward Cyan. Then, activate the “ellipse” tool. For the “fill” parameter, we can set it to “Foreground Color“. This is so that later the fill area uses the cyan color we chose earlier. Then, for the “outline” parameter, we can just set it to “No Outline“.

Next, click-drag on the canvas to create the top part of the hat.

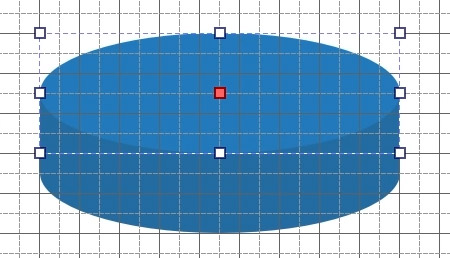
Then, use the “Select shapes tool”. And select the object. We can duplicate this object by pressing Ctrl + C and then Ctrl + V. Drag this new object so that it is directly under the first one. As you can experience, the grid and the snap features make it a lot easier to position the objects.

Next, we want to create a rectangle that connect the ends of the ellipses. Activate the “Rectangle” tool. Then create a rectangle by click-dragging from the left point to the right point, at the ends of the ellipse.

Then, reactivate the “Select Shapes Tool”. And select the top ellipse shape. Then we change the color to be a bit lighter. Right-click, and then select “Bring to Front“.

Next, we can select the rectangle and the bottom ellipse. Right-click, then select a “Logical Operation” called “Unite“.

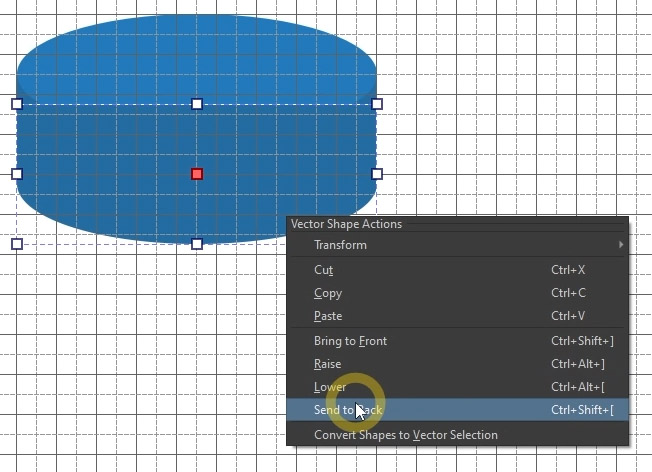
Essentially, the “unite” operation will combine the selected shapes into one new shape. Then, press Ctrl + C and Ctrl + V again to duplicate the shape. Reposition it so that it is horizontally centered on the other shape. But make it a bit lower. Right-click, and use the “Send to Back” command.

Then, change the color to a much darker version. Close to black. We want to make this area look like a circular ornament.

We can select the upper blue shape and then duplicate it. Position it at the center, but slightly downwards. Then use the “Send to Back” command.

Next, select the top shape. Duplicate again. Position it so it is at the center. Then scale this shape while holding down Ctrl and Shift. After that, use the “Send to Back” command. Then, we can press Ctrl + Shift + “ to hide the grid. And then press Ctrl + Shift + ; to disable the grid-snapping feature.

Next, create a box selection by click-dragging from right to left. Make sure all the shapes that make up the hat are selected. Then, right-click. Then choose “Group“.

While in the grouped condition, we can easily rotate all of them at once using the “Select Shapes Tool“.

Creating the fire
Now, we’re going to create the fire. To make the process a lot easier, we should create it on a separate layer. Create a new Vector layer by pressing Shift + Insert. Then click on the down arrow button in the layers docker, so that the layer is below the hat layer.

To create a free shape with lots of curves, the most suitable tool for this is the “Bezier Curve Tool”. For now, set the fill parameter to “not filled”. And for the “outline” parameter, use the “brush” option. In this condition, this tool will use the brush settings that are currently active.

To make the vector lines thin, you can set the brush size parameter to 5 pixels.

And, let’s use black first so that it will be easier to distinguish the line from the hat shapes. Then, we can create the flame shape with this tool. If you ever used the Pen tool in Photoshop or Adobe Illustrator before, in sha Allah, you’ll be able to use this tool right away.

But if you haven’t used this tool or any vector tools before, then I suggest you find additional references about this tool. This blog post is too short to cover everything in detail. If you are serious about learning Krita, you can join my online courses on Udemy or on Skillshare. In the intermediate level course, I cover how to use the “Bezier Curve Tool” step by step and in detail, from basic to advanced. You will learn how to create illustrations by combining Vector and Raster features.
If you are still not satisfied with the shape, you can activate the “Edit Shapes Tool“. With the “Edit Shapes Tool”, we can access vector points, handles, and also segments of a vector object to further customize the shape.
To fill the several shapes using the same color, we can first combine them all into a compound shape. To do this, first, we need to select them. Right-click, and choose a “Logical Operation” called “Unite“.

After all the shapes are considered as one object. We can set the color at once easily. For the stroke color, we can choose “No stroke color“.

And for the fill color, you may just use a solid color, if you prefer a flat style. But, for now, I want to use a gradient.

It will be too long to discuss the gradient settings in this blog post. So, let’s just use a gradient preset that is already provided by Krita. Find the one that looks like fire.

This actually already looks good, without the need for us to tweak it again. However, if you still want to adjust the orientation or the distribution of the colors, you can drag the yellow control points. Just tweak them until you are happy with the gradient condition.

Exporting to SVG
After you are done, you can select the vector hat objects in the “vector layer 1” layer. Then press Ctrl + X to cut them. Select the fire layer below it. Then press Ctrl + V to paste. Until now, you may be wondering. Why do we need to merge everything into one layer? Wouldn’t it be easier to manage if they stay separated in their own layer? The answer is that in Krita, the export function to SVG file format can only be done per layer. At least, that’s how it is in the Krita version that I used when making this tutorial. So, like it or not, we need to place everything inside a single layer. We can remove the vector layer above, as we don’t need it anymore.

Next, we can select all these vector objects. Then combine them as one group object. This is so it is easier if we want to scale them or perform other types of transformation. You can hold down Shift while scaling to perform a uniform scale. In other words, the width-to-height ratio remains the same.

After that, make sure the vector layer we want to export is active. Then, open the “Layers” menu. Choose the “Import-Export” sub-menu. Then choose the “Save vector layer as SVG” command.

You can specify any name you like for the SVG file. I’ll just name it “fire hat logo”. Next, we can test the condition of the file by opening it in an internet browser. I’m currently using Microsoft Edge. If we zoom in, that is by holding down Ctrl, then turning the scroll wheel. As you can see, because this logo is a vector image, it will not be pixelated.

You may also import and use SVG files, in almost all graphic software in the world nowadays. If you are interested in learning computer graphics further, you can visit my website “exposeacademy.com“. Apart from Krita, I also provide courses on Blender 3D, 3ds Max, Photoshop, Illustrator, SketchUp, and so on. Don’t forget to “Subscribe” to my Youtube channel also so you won’t miss future tutorials. If you want to request a tutorial about Krita, just write in the comment section what topic you want me to cover. I hope this tutorial is useful.
Wassalamu’alaikum.


